Lightning VME En: Unterschied zwischen den Versionen
Gaga (Diskussion | Beiträge) |
Tuxie (Diskussion | Beiträge) |
||
| (19 dazwischenliegende Versionen von 2 Benutzern werden nicht angezeigt) | |||
| Zeile 54: | Zeile 54: | ||
=== Hardwarerevisions and Firmware === | === Hardwarerevisions and Firmware === | ||
As of 17. | As of 17.03.2021, the hardware revisions B with firmware 05 are up to date. | ||
| Zeile 151: | Zeile 151: | ||
Then gently and evenly press the Lightning VME against the backplane with moderate force. | Then gently and evenly press the Lightning VME against the backplane with moderate force. | ||
Remember: may force be with you, young padawan! | |||
| Zeile 236: | Zeile 236: | ||
---- | ---- | ||
== ''' | == '''Software installation''' == | ||
The enclosed floppy disk contains the driver software for TOS / Magic and Mint as well as instructions in text form. | |||
It is divided for Atari TT and Atari Mega STE as follows: | |||
[[Bild:Inhalt_Diskette.jpg|400px]] | [[Bild:Inhalt_Diskette.jpg|400px]] | ||
''' | '''Caution:''' Do not swap: TT drivers do not run in MSTE and MSTE drivers do not run in TT. | ||
---- | ---- | ||
=== | === Configuration, meanings and contexts === | ||
'''loader.prg ( | '''loader.prg (just for Mint)''' | ||
The Loader is a utility that loads the USB stack and integrates it into the system. | |||
'''usb.prg / usbxxx.km''' | '''usb.prg / usbxxx.km''' | ||
This file is the USB stack that makes USB possible at the Atari. | |||
The USB stack manages the USB bus and the devices connected to it. | |||
It provides the necessary basic functions to the following drivers. | |||
''' | '''storage.prg und mouse.prg / storage.udd und mouse.udd''' | ||
These drivers are based on the USB stack and communicate with the connected devices, such as a USB stick (storage) or a USB mouse (mouse). | |||
These drivers can be extended as required, depending on availability. | |||
Thus eth.prg (already existing) or a keyboard.prg (planned) can provide the possibility of a network interface and a USB keyboard. | |||
'''blitz0x0.prg / blitzxxx.ucd''' | |||
This file is the link between the USB stack and the Lightning VME. | |||
It allows communication between the USB stack and the Lightning VME card. | |||
'''usb.acc''' | '''usb.acc''' | ||
This ACC under TOS and Magic ensures that the USB bus is hotplug capable. | |||
It therefore detects whether new devices have been connected and integrates them into the system. | |||
Of course, it also shows which devices are currently connected. | |||
additional note on ExtenDOS / MetaDOS in case of using a USB CD drive: | |||
This must be loaded after storage.prg. | |||
The USB driver provides an interface according to the SCSIDRV standard, which can be used directly with ExtenDOS. | |||
In the case of MetaDOS, a driver such as SPIN needed by Julian F. Reschke. | |||
---- | ---- | ||
=== TOS | === TOS and Magic === | ||
Here, the contents of the floppy's Auto folder are simply copied to the boot folder's Auto folder. | |||
''' | '''Attention:''' the correct order when copying or booting is essential! | ||
Use this bootorder under TOS: | |||
* USB.PRG | * USB.PRG | ||
* MOUSE.PRG | * MOUSE.PRG | ||
* STORAGE.PRG | * STORAGE.PRG | ||
* BLITZ030.PRG | |||
In case of using Magic, Magic has to be loaded before of the USB programs: | |||
* MAGXBOOT.PRG | * MAGXBOOT.PRG | ||
* USB.PRG | * USB.PRG | ||
* MOUSE.PRG | * MOUSE.PRG | ||
* STORAGE.PRG | * STORAGE.PRG | ||
* BLITZ030.PRG | |||
[[Hints:]] | |||
* | * a possible bootloader always comes first. | ||
* | * any additional, optional USB device drivers (ETH.PRG) will come after STORAGE.PRG / before BLITZ030.PRG | ||
* BIGDOS.PRG comes as the first program after the bootloader, in any case [before] MOUSE.PRG | |||
Here's an example of a working order: | |||
[[Bild:TT_Startprogramme.jpg|400px]] [[Bild:Bootorder.JPG|400px]] | [[Bild:TT_Startprogramme.jpg|400px]] [[Bild:Bootorder.JPG|400px]] | ||
If everything works correctly, it looks like this under TOS 3.06 (here with Nova Mach32): | |||
[[Bild:Lightning_TOS2.jpg|400px]] | [[Bild:Lightning_TOS2.jpg|400px]] | ||
You can see that the USB.ACC has found the Lightning as Root Hub as well as an optical USB mouse and a USB stick. | |||
[[Bild:TT_Lightning_Hddriver1.JPG|400px]] | [[Bild:TT_Lightning_Hddriver1.JPG|400px]] | ||
USB mass storage devices detected by the system can be set up as usual, here using the example of the HDDriver 10.10. | |||
[[Bild:TT_Lightning_Hddriver2.JPG|400px]] | [[Bild:TT_Lightning_Hddriver2.JPG|400px]] | ||
The same restrictions apply as for other drives. | |||
| Zeile 362: | Zeile 361: | ||
=== Mint === | === Mint === | ||
The installation under Mint is also not difficult. | |||
* | * Step 1: | ||
The drivers are not loaded from the Auto folder, but via the loader.prg from the USB directory under Mint. | |||
For this, copy all files from the directory a:\tt\mint from the floppy disk to | |||
'''C:\mint\1-19-cur\usb''' | '''C:\mint\1-19-cur\usb''' | ||
If the USB directory does not exist, it must be created. | |||
* | *Step 2: | ||
In the next step, the file mint.cnf, which is located at c:\mint\1-19-cur\, must be adapted. | |||
To do this, open this file with an editor (for example, QED, Luna, etc.). | |||
Pretty much at the end of mint.cfg there is a line called: | |||
'''GEM=u:/c/mint/1-19-CUR/xaaes/xaloader.prg''' | '''GEM=u:/c/mint/1-19-CUR/xaaes/xaloader.prg''' | ||
The following must be inserted before this line | |||
'''exec u:/c/mint/1-19-cur/usb/loader.prg''' | '''exec u:/c/mint/1-19-cur/usb/loader.prg''' | ||
The CUR may need to be replaced by its existing kernel version number. | |||
| Zeile 396: | Zeile 395: | ||
[[Bild:Lightning_Mint1.jpg|400px]] | [[Bild:Lightning_Mint1.jpg|400px]] | ||
When starting Mint, the Driver should bring about these issues. | |||
| Zeile 403: | Zeile 401: | ||
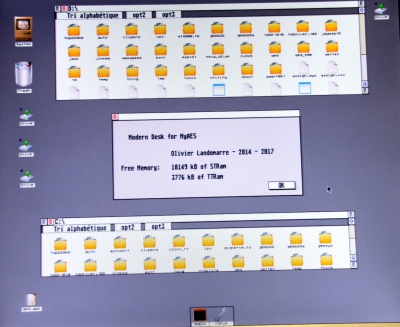
Then the USB devices are also available under Mint, here the example of MyAES Desktop. | |||
---- | ---- | ||
== '''USB2LAN''' == | |||
Note: the following entries are updated continuously. | |||
The following USB network adapters work with the Lightning (driver for Mint): | |||
* DLink | |||
** DUB-E100, silver, H / W Ver. B1 | |||
** DUB-E100, black, H / W Ver. C1 | |||
*" China-adapter" with ASIX chipset | |||
** AX88772A | |||
** AX88772B | |||
Attention: Currently there are USB2LAN adapters for small money (quite small and white housing). Often a different network chip is installed, as it is on offer. | |||
If the name AX88772 stands directly on the device, there is a high probability that this chip is actually installed. | |||
Notes on software installation: | |||
1. ETH.UDD must be in USB folder and ASIX.XIF in MiNT main folder. | |||
2. The device is called "asx0". | |||
3. It is configured like any other network card under MiNT, ie with ifconfig, route, etc. pp. | |||
---- | ---- | ||
== '''Lightning VME in interaction with other VME cards''' == | |||
Please follow this link and use a translator: | |||
[[Lightning VME USB Interface]] | |||
Scroll there to the very end of the post. | |||
---- | |||
== '''useful hints''' == | |||
=== XBoot / Cache === | |||
If you use Xboot, do not turn of the cache in the individual sets. Please let the cache activated otherwise you will get strange USB-related errors. | |||
Reason: The driver is testing the cpu speed at startup, when the cache is disabled at this point, then the drivers measures wrong data. When you activate it later in TOS then the measured performance does not match with the performance you have now, so you will get a lot of strange issues. | |||
last update: 26.5.2021 (tuxie) | |||
Aktuelle Version vom 26. Mai 2021, 21:15 Uhr
General
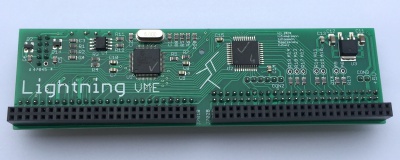
The Lightning VME is an internal plug-in card that extends the Atari TT and the Mega STE with two USB 1.1 compatible interfaces.
Features
- new developed in 2018 (Pakman, Tuxie, Czietz, Gaga)
- two USB 1.1 interfaces, expandable by USB-hub
- both ports can be used simultaneously
- no external power supply necessary
- even USB 2.0 devices work, but then at a reduced speed
- currently ca. 600kb/s transfer rate in unaccelerated TT
- also works in accelerated TT, thus further increase in performance (tested with 20MHz bus and 40MHz CPU)
- Transferrate is customizable
- compact design, fits in the original case of both the MegaSTE and the TT
- plug and play - fully pluggable solution
- central elements are a programmable Logic Device (CPLD) from Xilinx and the ISP1160 USB-Host-Controller from Philips
- handmade, SMD in reflow process
- triple protection of both USB ports:
- electrostatic discharge (ESD) protection when connecting external devices
- overcurrent protection by self-healing fuses
- secured against twisting the USB bracket by coding and labeling
- other interfaces, ROM port, ACSI interface and VME slot remain free
- support real USB mice, not only with PS/2 protocol
- finally true support of mass storage even under TOS
- works under TOS 2.06 and 3.06, Magic 5.x and Mint
- only occupies the address range 0xFEFF8000 - 0xFEFF8009 of the VME bus in the TT
- especially suitable in combination with Thunder IDE Interface and / or Storm
Description
The Lightning is designed so that no soldering is required; it´s is plug and play.
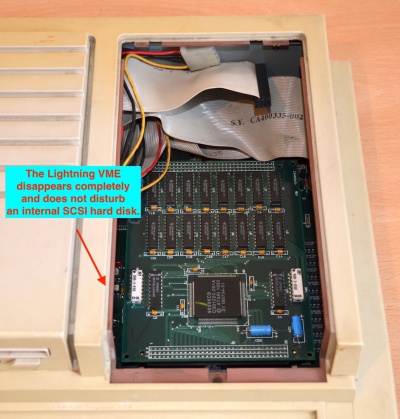
It disappears completely inside the original case.
Currently drivers for mass storage, mice and USB2LAN devices are available. Extensions by new drivers are possible, e.g. USB keyboard or USB floppy.
Now it´s possible to use:
- USB mice
- USB memory sticks
- USB card readers (SD, CF etc.)
- USB2LAN (with Asix 88772 chipset)
- USB CD / DVD drive (note current limitation and installation of ExtenDOS / MetaDOS required)
- USB keyboard (in planning)
- etc.
This finally enables the use of up-to-date hardware as well as the simplest data exchange in the world of Windows or OSX.
Hardwarerevisions and Firmware
As of 17.03.2021, the hardware revisions B with firmware 05 are up to date.
Hardware installation
The installation of the Lightning VME in the TT is very easy. Please follow the instructions below.
The card fits in all 3 known motherboard versions of the TT:
- Daughterboard - CPU (plugged)
- PGA CPU (plugged)
- SMD CPU (soldered on) - this version is particularly well suited for easy installation.
The Lightning VME harmonized well with the Thunder IDE Interface and the Storm. The cards are not hindering each other.
There is a small possibility that after installation of the Lightning VME your existing TT-RAM extension does not physically fit into the TT.
This applies, for example, to the original FAST RAM extension card from Atari (1/4/16 MB).
Then it's time to swap them for a [Storm] (up to 256 MB).
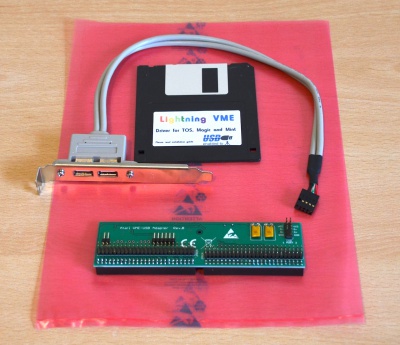
Delivery.
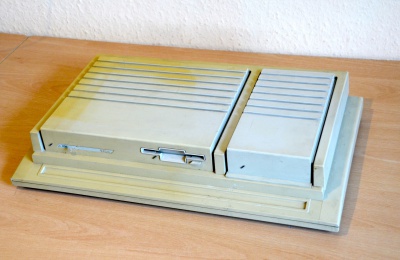
The computer in the closed state, here a little bit yellowed version.
Do not forget: all works without electricity!
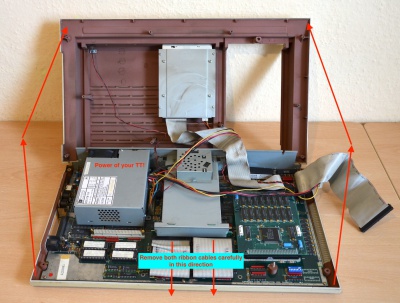
After loosening the screws on the underside, carefully fold up the upper shell.
Carefully remove the two front ribbon cables from the backplane of the VME board.
The VME backplane is held by the metal cage.
It is not mandatory to remove the metal cage and / or the backplane.
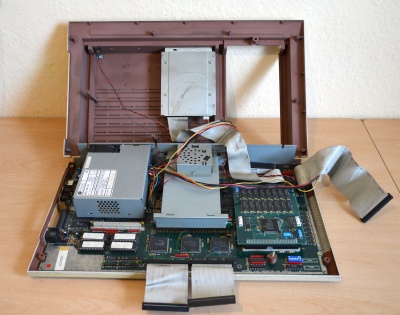
View after opening the TT, looking at the VME backplane and the VME metal cage.
Here are the ribbon cables removed. That's half done!
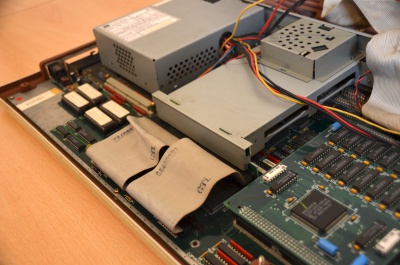
Here is a close-up.
It is a TT with SMD CPU.
There is a lot of space for the installation of the Lightning.
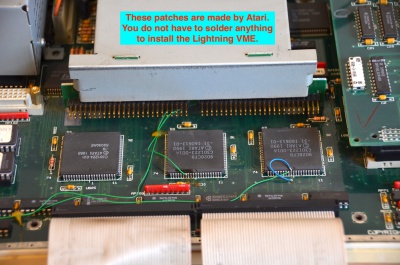
The cabling is factory patches from Atari.
Soldering to install the Lightning VME is not required.
Another close-up. The TT is ready to plug in the Lightning VME now.
Gently bring the Lightning VME to the backplane. Page and direction are self-explanatory.
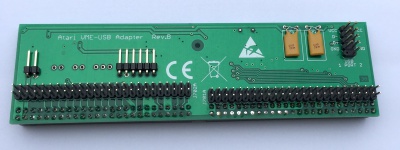
If you are sitting in front of the TT, you should be able to read on the top left "Atari VME-USB Adapter Rev. B" and the CE sign and two yellow, angular components.
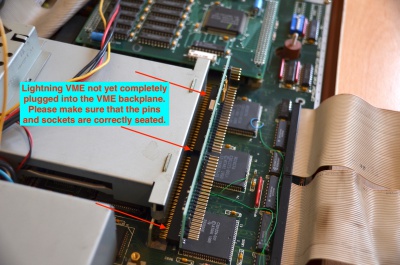
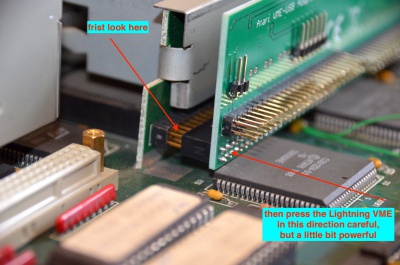
Ensure correct position! No backplane pins should be visible.
Then gently and evenly press the Lightning VME against the backplane with moderate force.
Remember: may force be with you, young padawan!
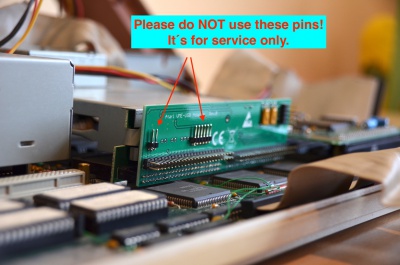
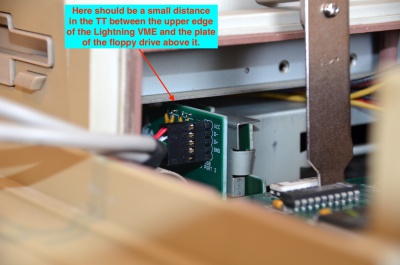
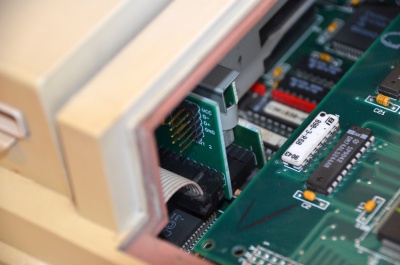
By the way: please do not use the now visible, angled pins, do not connect either, otherwise there is a risk of damage.
The pins are exclusively for service (uploading the firmware).
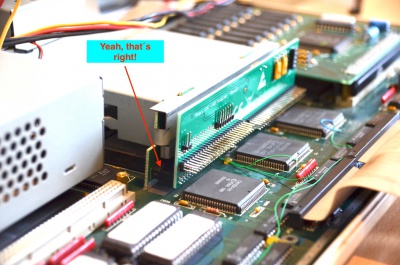
That is exactly how it should look.
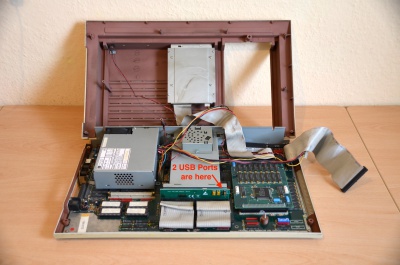
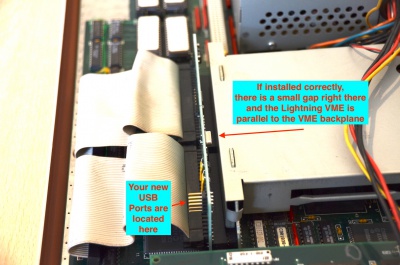
The TT now has 2 USB ports on the right side towards the internal hard drive / ST-RAM.
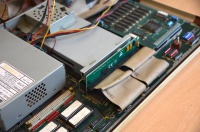
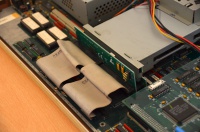
Seen from left and right.
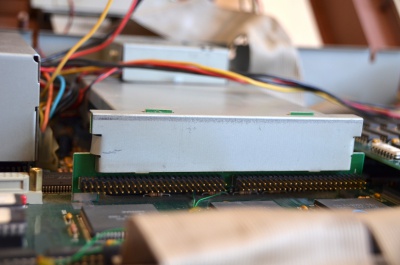
Here you can see that the Lightning VME is parallel to the VME backplane, but without touching it at the top.
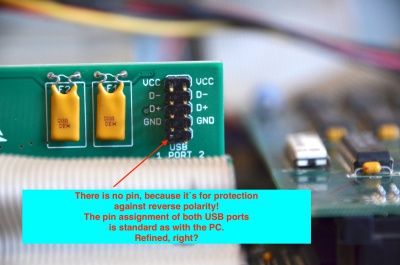
Closeup of the USB pins, divided into port 1 and 2.
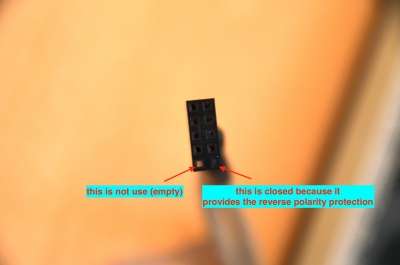
There is no pen on the bottom left - this is the encoding for the USB bracket.
Plug of the USB bracket.
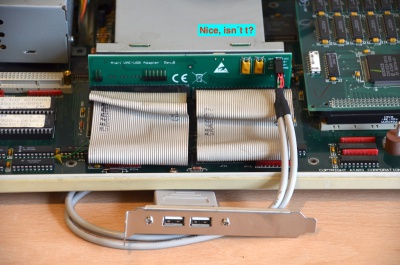
Nice to look at, right?
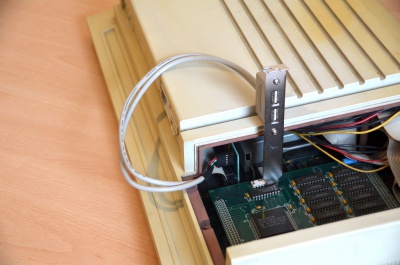
Here with closed top, but missing the so called "lunch box".
The bracket can be installed as desired, e.g. to the rear.
How about connecting a Teac FD-CR7 internally to one of the USB ports?
Of course, the lunch box fits on it again, even with a hard drive.
Custom work.
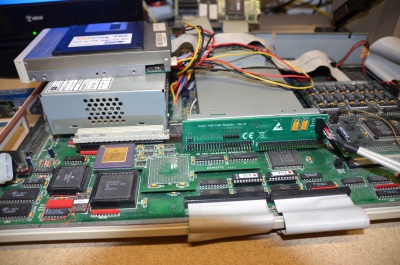
The picture shows the Lightning VME in a Daughterboard TT.
When everything is installed and screwed together, only the software has to be installed.
Software installation
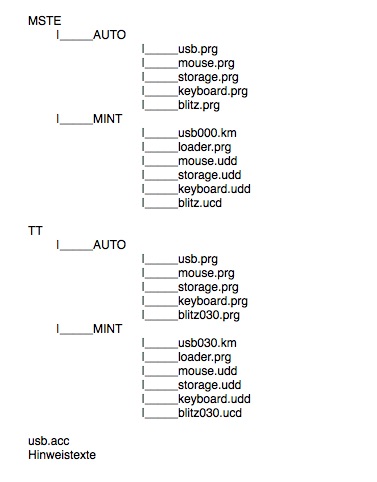
The enclosed floppy disk contains the driver software for TOS / Magic and Mint as well as instructions in text form.
It is divided for Atari TT and Atari Mega STE as follows:
Caution: Do not swap: TT drivers do not run in MSTE and MSTE drivers do not run in TT.
Configuration, meanings and contexts
loader.prg (just for Mint)
The Loader is a utility that loads the USB stack and integrates it into the system.
usb.prg / usbxxx.km
This file is the USB stack that makes USB possible at the Atari.
The USB stack manages the USB bus and the devices connected to it.
It provides the necessary basic functions to the following drivers.
storage.prg und mouse.prg / storage.udd und mouse.udd
These drivers are based on the USB stack and communicate with the connected devices, such as a USB stick (storage) or a USB mouse (mouse).
These drivers can be extended as required, depending on availability.
Thus eth.prg (already existing) or a keyboard.prg (planned) can provide the possibility of a network interface and a USB keyboard.
blitz0x0.prg / blitzxxx.ucd
This file is the link between the USB stack and the Lightning VME.
It allows communication between the USB stack and the Lightning VME card.
usb.acc
This ACC under TOS and Magic ensures that the USB bus is hotplug capable.
It therefore detects whether new devices have been connected and integrates them into the system.
Of course, it also shows which devices are currently connected.
additional note on ExtenDOS / MetaDOS in case of using a USB CD drive:
This must be loaded after storage.prg.
The USB driver provides an interface according to the SCSIDRV standard, which can be used directly with ExtenDOS.
In the case of MetaDOS, a driver such as SPIN needed by Julian F. Reschke.
TOS and Magic
Here, the contents of the floppy's Auto folder are simply copied to the boot folder's Auto folder.
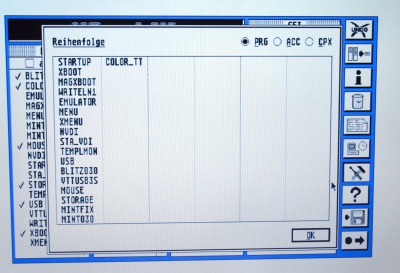
Attention: the correct order when copying or booting is essential!
Use this bootorder under TOS:
- USB.PRG
- MOUSE.PRG
- STORAGE.PRG
- BLITZ030.PRG
In case of using Magic, Magic has to be loaded before of the USB programs:
- MAGXBOOT.PRG
- USB.PRG
- MOUSE.PRG
- STORAGE.PRG
- BLITZ030.PRG
- a possible bootloader always comes first.
- any additional, optional USB device drivers (ETH.PRG) will come after STORAGE.PRG / before BLITZ030.PRG
- BIGDOS.PRG comes as the first program after the bootloader, in any case [before] MOUSE.PRG
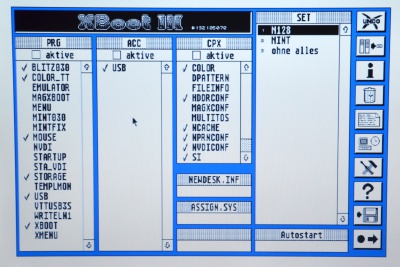
Here's an example of a working order:
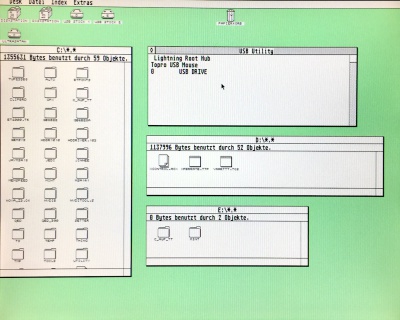
If everything works correctly, it looks like this under TOS 3.06 (here with Nova Mach32):
You can see that the USB.ACC has found the Lightning as Root Hub as well as an optical USB mouse and a USB stick.
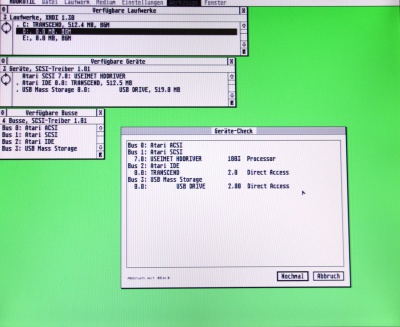
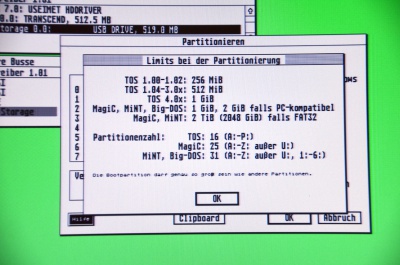
USB mass storage devices detected by the system can be set up as usual, here using the example of the HDDriver 10.10.
The same restrictions apply as for other drives.
Mint
The installation under Mint is also not difficult.
- Step 1:
The drivers are not loaded from the Auto folder, but via the loader.prg from the USB directory under Mint.
For this, copy all files from the directory a:\tt\mint from the floppy disk to
C:\mint\1-19-cur\usb
If the USB directory does not exist, it must be created.
- Step 2:
In the next step, the file mint.cnf, which is located at c:\mint\1-19-cur\, must be adapted.
To do this, open this file with an editor (for example, QED, Luna, etc.).
Pretty much at the end of mint.cfg there is a line called:
GEM=u:/c/mint/1-19-CUR/xaaes/xaloader.prg
The following must be inserted before this line
exec u:/c/mint/1-19-cur/usb/loader.prg
The CUR may need to be replaced by its existing kernel version number.
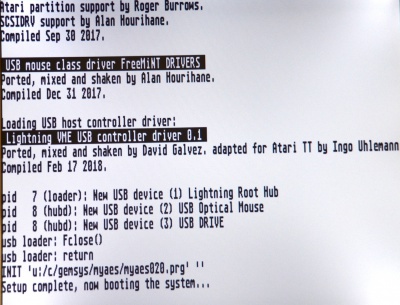
When starting Mint, the Driver should bring about these issues.
Then the USB devices are also available under Mint, here the example of MyAES Desktop.
USB2LAN
Note: the following entries are updated continuously.
The following USB network adapters work with the Lightning (driver for Mint):
- DLink
- DUB-E100, silver, H / W Ver. B1
- DUB-E100, black, H / W Ver. C1
- " China-adapter" with ASIX chipset
- AX88772A
- AX88772B
Attention: Currently there are USB2LAN adapters for small money (quite small and white housing). Often a different network chip is installed, as it is on offer.
If the name AX88772 stands directly on the device, there is a high probability that this chip is actually installed.
Notes on software installation:
1. ETH.UDD must be in USB folder and ASIX.XIF in MiNT main folder.
2. The device is called "asx0".
3. It is configured like any other network card under MiNT, ie with ifconfig, route, etc. pp.
Lightning VME in interaction with other VME cards
Please follow this link and use a translator:
Scroll there to the very end of the post.
useful hints
XBoot / Cache
If you use Xboot, do not turn of the cache in the individual sets. Please let the cache activated otherwise you will get strange USB-related errors.
Reason: The driver is testing the cpu speed at startup, when the cache is disabled at this point, then the drivers measures wrong data. When you activate it later in TOS then the measured performance does not match with the performance you have now, so you will get a lot of strange issues.
last update: 26.5.2021 (tuxie)
